
No-Prep Veneers
Minimally invasive veneers that preserve your natural tooth
What are no-prep veneers?
Veneers placed without significant grinding of the natural tooth.
Generally thinner than traditional veneers, adhering directly to existing enamel.
Conservación de la estructura dental
Preserves natural dental structure.
Proceso más rápido
Faster and less invasive process.
Reversibilidad
Potentially reversible procedure.
Not suitable for all cases. Consult with a qualified dentist.
Why choose ENIQ?
Advanced technology preserving your dental structure.

Procedure
The no-prep veneer procedure involves the following steps:
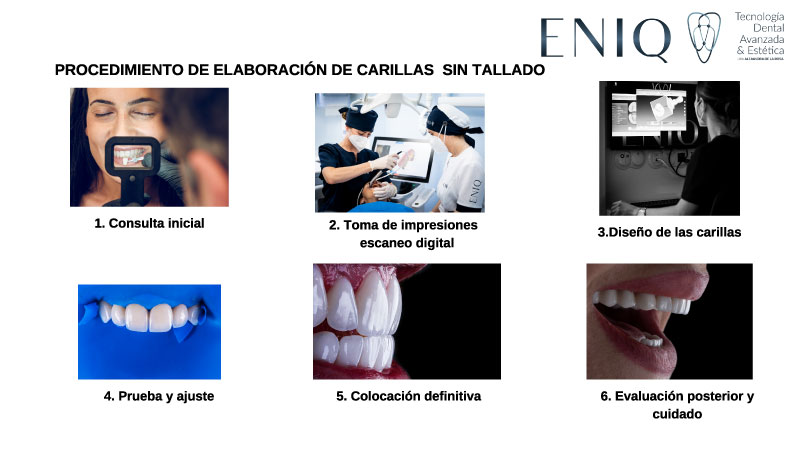

Procedimiento
Initial consultation
Evaluation of aesthetic goals and oral health.
Impressions
Digital scanning or impressions for 3D model.
Design
CAD design for optimal precision.
Fabrication
Precision computerized milling.
Fitting and adjustment
Verification of fit and color.
Placement
Final adhesion with special light.
Care
Maintenance instructions.
The specific process may vary depending on each case.

How many appointments needed?
Usually 2-3 appointments for complete placement.
- Initial consultation: Evaluation and digital scanning.
- Fitting and adjustment: Result verification.
- Final placement: Permanent adhesion.
With or without prep?
The choice depends on individual needs and dentist recommendations.
- With prep: Greater correction flexibility. Predictable results.
- No prep: Preserves natural dental structure. Faster and less invasive process.
Discuss your goals with your dentist to make an informed decision.
What are the disadvantages?
Some considerations to keep in mind:
Limited thickness
May not hide severe imperfections.
Shape and size limitations
Cannot make major changes.
Appearance risk
May be more opaque than traditional.
Dental sensitivity
Some patients may experience sensitivity.
Limited reversibility
Removal may be difficult.
Discuss your concerns with your dentist.
cosmeticDentistry.noPrepVeneers.pricing.title
cosmeticDentistry.noPrepVeneers.pricing.treatmentName
cosmeticDentistry.noPrepVeneers.pricing.treatmentSubtitle
cosmeticDentistry.noPrepVeneers.pricing.cardDescription
Todo incluido

FAQ
Preguntas frecuentes sobre carillas sin tallado
Resuelve tus dudas sobre carillas sin tallado en Madrid. customer service.